Monday, May 28, 2007
White, The Most Color Used in Oil Painting

White is the most commonly used colour in oil painting from the earliest stages through to finishing touches and highlighting. However not all whites are the same. Understanding how they perform helps the artist to choose the right white for the painting in progress.
Here are the most common ranges of white. Although some factory offer more specific types.
Titanium White: The most popular modern white. It is the whitest, and the most opaque bright white with exceptional covering power for strong highlights. It can also be used for mixing and is a good all purpose white.
Zinc White: Less opaque slower drying white, used in the later stages of a painting for subtle highlighting, glazing and blending with other colours to create pale tints. It has a blue undertone.
Iridescent White: A mica based pigment which makes a pearlescent white. It is effective when mixed with transparent colours, and used over dark underpainting.
Underpainting White (fast drying): A titanium pigment ground in linseed oil which is recommended for underpainting or extensive layering with white. It dries quickly to a flat, matt, toothy finish. Specially formulated to resist cracking and shrinking in the early stages of painting.
Flake White (The Old Masters White): Based on lead pigment, suitable for all stages of a painting. It's a high performance milky white, noted for its opacity and durable paint film. When mixed with other colours it creates pure clean tints with minimum loss of tonal value. A titanium based formulation which avoids the hazardous lead based Flake White No. 1. It has a lower tinting strength than Titanium White to match Flake White and a similar drying rate to the original. Classified as toxic according to EC legislation and available only in tins for EC countries.
Friday, May 18, 2007
Art Auction Tips

Holding an art auction is an excellent way for non-profits to raise money, for artist-donors to get free publicity, and for bidders to get quality art at reasonable prices. The following pointers will help everyone have a great time and realize their goals at art auction fundraisers, regardless of whether they're buying, selling, or donating.
Tips for artists:
** Career-wise, the best fundraisers for donating are those that support visual arts organizations and attract members of visual arts communities. These are great opportunities to get your art and your name out in front of anywhere from dozens to thousands of people who like art, collect art, and support the visual arts.
** Donate to a non-art related fundraiser only when it's an established art auction or you believe strongly in the organization's goals, and not because anyone promises you career benefits. Donating to a fundraiser that only has a few pieces of art mixed in with lots of other merchandise, or only attracts politicians, environmentalists, or health care professionals, for example, usually does little for your career.
** Before you decide which piece of art to donate, talk to the people conducting the auction and ask what types of art and what price ranges sell best. The more accurately you pinpoint bidders' tastes and budgets with your donation, the better the chances that it attracts attention and sells for a good price.
** Donate a good piece of art. Don't donate the worst, least significant, or most outdated piece you have lying around your studio. You want your donation to reflect positively on your level of generosity as well as on the quality and type of art that you're currently producing.
** Include your bio and contact information with your art. You want to attract and introduce yourself to as many new collectors as possible. People who like your art tend to bid higher when they know something about you, what you've accomplished in your career, and how to reach you if they want to buy or learn more.
** Whether your art auctions silently or live, set the minimum acceptable opening bid and selling prices as low as possible. When you set these dollar amounts too high, you scare bidders away. Remember that many people go to art auction fundraisers looking for bargains. Also remember that having nobody bid on your art reflects poorly on your career.
** If you refuse to sell your art below a certain price, set your opening bid below that price, but tell the people conducting the auction that you'll only sell when that certain price is reached. For example, if you want a selling price of $500, start the bidding at $200. That way, even if the art doesn't sell, it'll at least attract bids. Be aware, though, that insisting on too high a selling price may show that you're more concerned about yourself and how much your art is worth than you are about the goals of the organization selling it.
** If you're a good artist, you have an established track record of shows and sales, and people know it, your art will be bid up to a fair selling price no matter how low you set the opening bid.
** Cooperate with the people conducting the auction and generally do everything within your power to make sure your art sells. The worst possible outcome at this type of event is for your art not to sell.
Tips for bidders:
** Look at all the art. Fundraising art auctions are great places to learn about art and artists you've never seen or heard of before.
** Don't automatically assume that all art is bargain priced. Find out about artists whose art you like before you bid. The best way to do this is to preview the art ahead of time or get a list of artist donors. That way, you're prepared to bid wisely.
** Make sure that you're getting a quality current example of an artist's work. Unfortunately, some artists donate low-end, oddball, or problem pieces that they can't sell and want to get rid of.
** Be generous. You're attending the auction to support the organization selling the art. Going a bit over budget is not so bad when those few extra dollars go to a good cause.
** Artists often attend fundraising art auctions and position themselves in the vicinity of their art. Keep your eye out for opportunities to meet artists and learn about their art.
** Go easy on the wine. Nothing is worse than finding out the next morning that you've paid too much for a piece of art that you can't stand to look at.
Tips for organizations conducting art auction fundraisers:
** Publish submission guidelines for artist donors. Include pointers on what types of art sell the best, what price ranges bidders like to buy in, and how artists can best present themselves and their art.
** Tell artists how the auction is promoted, how they benefit from the publicity, and how many people come to see their art.
** Urge artists to set minimum bid and selling prices as low as possible.
** Publish a sale catalogue that includes basic information about each artist and work of art that's for sale. Mail it out to attendees as soon as they pay for their tickets. The better you promote the event, the better quality art, artists, and bidders you attract.
** Choose a venue with plenty of room, good ventilation, and adequate display space. Contented bidders are active bidders.
** The admission price to the auction should include complimentary refreshments.
** Make sure that the most active bidders get preferred seating.
** Hire an auctioneer with experience doing fundraising auctions. Get names and contact information from other non-profits that have held successful charity auctions. Fundraisers are not like ordinary auctions where you want to move merchandise as fast as possible to bidders looking for bargains. A skilled charity event auctioneer can make a huge difference in the bottom line.
** Your auctioneer should have a sense of humor, be able to excite an audience, encourage competition among bidders, spend time presenting and describing each item, and convince bidders into being extra generous on behalf of the causes that your organization represents.
** Make sure the auctioneer has notes describing each work of art. Well-described art sells for more money than poorly described art.
** Display each piece of art as prominently as possible. The better the art looks in its surroundings, the higher bidders bid. This is especially true for live auction items. Use quality easels, white gloves, cascading velvet backdrops, pinpoint spotlights, and so on.
** Make sure bidders can find out about any artist whose art they want to bid on. The more informed bidders are and the more comfortable they feel about bidding, the higher they tend to bid.
Wednesday, May 16, 2007
Important Things To Remember When Using Pallet

1. Having a clean organized palette is an essential part of good painting. If you are just starting out with oil painting, these tips will help you get a good start.
2. You should have the right kind of palette to start off with. Your palette should be non-porous to prevent absorption of oil from the paint. Palettes come in a variety of different materials from glass to wood. My personal preference is the BOB ROSS Clear Palette. I have found this palette the easiest to clean and best for mixing colors.
3. When you are first starting out, it may be a good idea to start with a fairly limited palette of colors. If you purchase every color under the sun, you may find yourself mixing too many different colors, which will result in a muddy painting. Start off slow in the beginning, then add more colors as you become more experienced. Color choices for a limited palette vary from artist to artist. Here are the colors of my palette: Yellow Ochre, Cadmium Yellow Pale, Alizarin Crimson, Cadmium Orange, Phthalo Blue, Burnt Sienna, Burnt Umber, Cadmium Red Medium, Phthalo Green, Titanium White, Ivory Black. I recommend purchasing 1.25 oz tubes of all colors except Titanium White. Purchase a larger tube of Titanium White, as you will be using more of this color.
4. First, you should get into the habit of laying out your colors the same way every time you paint. This is just good practice and keeps the painting process flowing nicely. Arrange your colors along the edges of your palette leaving a lot of room in the center for mixing.
5. Don't be afraid to squeeze out a good amount of paint, especially your whites. You will be more productive if you aren't continuously stopping to squeeze out more paint.
6. Make certain to include all of the colors you think you will need to complete that session of painting as well. Again, this will make you more productive.
7. When adding paint to the palette, I have found that squeezing the paint out in long lines, as opposed to puddles, keeps my colors cleaner. When you have puddles of paint, they tend to get soiled by other colors when mixing. With a long line of paint, you can just take paint from the end as needed and not dirty the rest. Keep some rags or paper towels handy for wiping your palette knife clean.
8. It's a good idea to continuously wipe your palette clean during the painting process. There is nothing more frustrating then trying to remove dried up oil paint. Keep some alcohol handy so that you can keep the mixing area of your palette clean.
Wednesday, May 9, 2007
Oil Painting Tips for Beginners

Start your oil paintings with an acrylic underpainting - When you start an oil painting using oils, it can take some time for that initial layer to dry. Starting your painting with an acrylic underpainting however is a wonderful time saver as acrylic paint dries quickly and oil paint can be applied over the acrylic.
Make certain you have good lighting - I didn't realize how important good lighting was until I painted outdoors for the first time. Good lighting brings out the color and also lessens the strain on your eyes. If you can, paint in a place that gets plenty of natural sunlight. If you cannot afford this luxury, purchase a good indoor light. Check out http://www.ottlite.com/ for a great selection of lighting products.
Make sure you have good ventilation - If you are using materials like oil painting thinners and cleaners in your studio; make sure you have good ventilation. Some of these chemicals can be quite toxic so use caution when working with these products. Consider using a water miscible paint like Grumbacher Max Oil Paints. Max Oils can be diluted with water thereby eliminating the need for solvents.
Fat over lean - Follow this rule and you will reduce the chance of your paint cracking. Each layer of your oil painting should have a higher oil content then the ones below it.
To create the illusion of distance in your paintings paint receding objects with cooler less intense color. Objects that advance are warmer and more intense.
If you are feeling uninspired don't get discouraged. Try taking a walk outside, breath in the air, look around at the beautiful earth God created. Try playing music while you are painting. You will be surprised how music can affect your painting. Visit a museum or local gallery. Viewing other works of art can really get your creative juices flowing.
When holding your brush avoid holding your brush like a pencil too close to the bristles. Oil brushes are made long for a reason so that you can paint further away from the canvas. Practice holding the brush toward the middle and end of the handle.
Maintain a clean organized working environment - Get yourself into the habit of keeping your work area clean and organized. Have an abundant supply of rags or paper towels nearby. Get a few glass jars for storing mediums, solvents and your used brushes while painting.
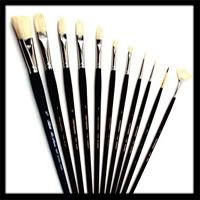
Brush Selection and Care - You should probably invest in a good set of brushes. Cheap brushes are not recommended as they shed their bristles quite easily while painting. I prefer working with Hog Hair brushes, but oil painters also use sable and synthetic sable. Avoid nylon brushes, as these are better suited for acrylic paint. My brushes include a variety of flats sizes #3, #6, #8, #12, a #4 fan, and a few small rounds for detail work. Selections vary from artist to artist, depending on painting style usually, but the above mentioned work fine for me. Take excellent care of your brushes. This is very important, especially if you have an expensive set of brushes. You may want to do a search online for more in depth brush care instructions. If you do not clean and store your brushes properly, you will ruin them, simple as that. Use a quality brush cleaner and preserver that you can purchase online or at your local art store.
About the author:
Ralph Serpe is Webmaster and Cofounder of Creative Spotlite - http://www.creativespotlite.com, a free educational art and craft community.
Thursday, May 3, 2007
Basic Preparation for Sumi-e Painting

The materials you will need for sumi-e can be purchased at most stores specializing in Oriental goods or from art shops. Prices will vary, depending on the store and on the quality of the items.
1. Brush.
There are many kinds of fude (sumi-e brushes). You will need just one brush. Its bristles made from deer, goat, or boar hair, should be about 1 5/8 inches long with a diameter of about 3/8 inches (or about 40mm by 10mm). New brushes often contain starch in their bristles to stiffen and protect them during shipment. Soften the brush by pressing it repeatedly with light pressure onto a small water-filled plate until the starch runs off. After use, rinse the brush thoroughly with clear water.
2. Suzuri.
Suzuri (ink stone) are carved from stone and have a well to hold water and a flat surface on which the sumi (ink) stick is ground or rubbed to produce ink. Suzuri comes in many different shapes and sizes. After use, clean the suzuri thoroughly with running water. Old, dried sumi on the suzuri is very hard to remove and will interfere with the even rubbing of the sumi stick.
3. Sumi stick.
Sumi sticks are made from powdered carbon of burnt pine or lamp black, plus a binding agent. When a sumi stick is rubbed back and forth with a small amount of water on the level surface of the suzuri, small carbon particles come off the stick and dissolve in the water to produce ink. Four different “black” shades are available: black-black and black-brown (used for winter or rocky, mountainous scenes) and black-blue and black-purple (for gentle springtime scenes). You can use any of these shades, but the black-blue sumi will probably show your work off best in the beginning.
4. Paper and cloth.
Sumi-e is best done on kind of paper that will absorb moisture from the wet brush as you paint. Any kind of paper with this characteristic will do, and even ordinary newspaper can be used for practicing. Flat sheets of gasenshi (often called “rice paper” in the West but actually made from plant fibers) are particularly well suited for sumi-e. Gasenshi can be purchased at the store where you buy your other materials.
A cloth, preferably a piece of felt, may be placed under the paper to absorb excessive moisture.
Sumi-e paper is very delicate and should be stored flat in its wrapper. Paper in rolls is sometimes available, but you may need to use a weight to hold the paper, preventing it from curling while you work.
5. Small dish and bowl.
You will need a small dish in which to make medium-color ink. A small double-welled bowl filled with water can be used to wash and moisten your brush.
PREPARATION
Lay out the sumi-e materials on a desk or table as shown in the photograph. Pour clean water into the well of the suzuri and into the small bowl until they are each about three-quarters full.
Making ink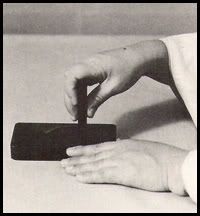 Hold the sumi stick vertically against the suzuri’s surface. Dip its lower end into the well of the suzuri and draw some of the water up onto the suzuri’s level surface. Carefully and with even strokes—but without too much pressure—rub the sumi stick over the surface, back and forth. Keep the sumi stick perpendicular; rubbing at an angle will cause carbon particles to come off the stick unevenly and will result in poor ink. Five to ten seconds should give you good sumi. You will be applying sumi to your brush directly from suzuri’s level surface; when the sumi has been used up, just repeat the above process to make more.
The depth of color is the result of the amount of water you use and the length of time you rub the sumi stick. As you gain experience you will know the thickness of the ink you need, that will differ according to the object you want to paint and the effect you want to create.
You will often need sumi of medium color to paint light lines or to change the brush with different sumi shades. To make medium-color sumi, use the tip of your brush to transfer small amount of dark sumi from the suzuri to the small dish, the dilute the ink with a few drops of water from your wet brush and mix until the desired tone of color is obtained.
Applying sumi to the brush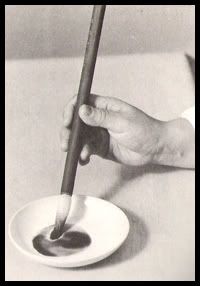 Never apply sumi to a dry brush. Dip the brush in water and gently swab its bristles against the edge of the bowl to prevent dripping. If you need to use only the tip of the brush to paint a fine line, remove more water from the brush. This will make the bristles firmer, giving better support and control as you paint.
You may charge the brush with dark sumi only, with medium-color sumi only, or with the combination of the two. When a brush is charged with two tones of ink plus water, the ink tones and water overlap and blend together on the paper to give the painted line the appearance of depth. Western artist add depth using fine shading techniques; but the sumi-e artist can get the same effect with a single stroke of the brush.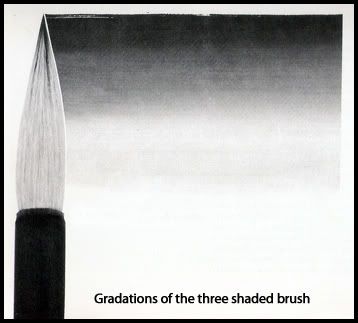 To prepare this “three-shaded” brush (water can thought of as one shade), draw the wet brush through the medium-color sumi you have prepared in the small dish; let the medium-color sumi evenly saturate two-thirds of the brush from the tip up. Then draw the brush through the dark sumi on the level surface of the suzuri, but this time let the sumi saturate only the lower third of the bristles. The result will be a brush charged, from the tip up, with one-third dark sumi, one-third medium-color sumi, and one-third water.
When painting a thin line, you can saturate less of the brush with sumi; but the medium and dark shades of sumi on the brush should always be kept in the ratio of two to one. When using a dark or medium shade alone, apply only as much sumi to the brush as you need.
Friday, April 13, 2007
15 Tips to Start Painting with Oil Painting
 1. Stop looking at modern art and stop loving it. Modern bright colors and hue contrasts destroy the subtle vision of the painter who risks to study classical painting in our time.
2. Many painters get an energy charge from music. Stop listening to any modern music and begin listening only to classical music. Try to begin loving it.
3. Brushes. You should have many brushes so that not to lose time washing them while working. Take a new brush for every new mix. Use round kolinsky brushes, #1 to #10. To cover larger surfaces, you will need a few #20 to #35 brushes. For final strokes PRIPLAVLENIYE (final blending) you will need a few very soft round and flat average size squirrel brushes. Brushes should be treated very carefully. After every session they should be washed in turpentine and after that in warm water with soap.
4. The palette must be made of hard dark wood, best of all, of pear. After work wash the palette with turpentine and scrape it with a razor. Before work wipe the palette with linseed oil.
5. The canvas should be primed additionally a few more times and in conclusion it should be ground with fine sandpaper. After that the canvas should be scraped with a razor to remove the canvas texture till smooth dead surface similar to the egg's surface is achieved.
6. It is very important to have objects for still lifes in the studio. Don't be stingy at garage sales and flea markets, you may regret it later.
7. The drawing is made on paper life-size to the smallest details. Then it is transferred to the canvas by carbon-paper. After that the drawing is outlined with brown ink because the first oil layer - IMPRIMATURA (transparent coat that is equal to the middle tone of largest, lightest object in painting) - will wash away the pencil, but the ink will remain visible almost through the last layers.
8. Before each new layer the canvas (ideally dried during 7 weeks) is carefully wiped with a half of an onion (in order to prepare the dried surface to absorb better) and then with linseed oil. After that the canvas is wiped with a soft piece of cloth.
9. The lacquer for IMPRIMATURA is made of 2% of dry DAMAR CRYSTALS and 98% of turpentine. The lacquer for painting is made of 5-10% of dry resin and 90-95 % of turpentine. A couple of lavender oil drops are added directly to the oil-can. Scientists say lavender oil stimulates the brain. However, I think that old masters added it to eliminate the heavy turpentine smell. The lacquer for the final step consists of 30% of DAMAR CRYSTALS, 3% of linseed oil, and 67% of turpentine.
10. The basic set of paints is the following: "Rembrandt" oil colors: Flake White, Yellow Ochre Light, Red Ochre, Burnt Umber, Raw Umber Ivory and Lamp Black (7 Basic Colors), and 4 extra colors (when necessary) which I use in the last layers: Flake Yellow (instead of it also can be used Cadmium Yellow Deep), Madder Lake Deep, Chinese Vermilion, Prussian Blue. But be careful, use these last 4 colors very sparingly.
11. IMPRIMATURA, or the first paint layer. The canvas is covered with a liquid mixture based on Red Ochre, Yellow Ochre Light and Ivory Black (the mixture should have an olive hue).
12. The shadow PODMALYOVOK (the process of creating intermediate layers) is made with Burnt Umber in two layers (2nd and 3rd layers). In the second layer all details are made excluding the texture. In the third layer LESSIROVKA of the main tone masses is made with a big brush.
13. The dead layer - the fourth PODMALYOVOK - is made with white lead, light ocher, red ocher, and burnt bone. The aim of this PODMALYOVOK is penumbra. The picture must look as if its objects were lit with moonlight - olive cold gray color. Colors are applied thickly, half a tone higher, shadows are very transparent, half a tone lower.
14. The first and the second TEL'NII (flesh tones: main life colors) PODMALYOVOK (5th and 6th layers). The first TEL'NII PODMALYOVOK is made half a tone lighter and two tones lighter in colors; and half a tone darker and two tones lighter in shadows. The same is true of the second TEL'NII (?body?) PODMALYOVOK.
15. LESSIROVKA - the seventh layer: details of textures, thickly applied highlights, bright reflections, and signature. In this layer you may use additional paints: Prussian blue, red cinnabar, yellow flake (cadmium yellow deep), madder lake deep.
by Alexei L. Antonov.
You can find more interesting tips and how to on Art Education: Free Oil Painting Lesson


